Saturday, 28 February 2015

How to Draw the Minecraft Diamond Sword Tutorial


STEP 1. You will first draw the handle with the bottom knob being diamond shaped. Add the small handle and then move to step two.


 STEP 2. Here you will draw the hand guard and notice how the ends are pointed and what else, diamond shaped.


 STEP 3. You will now draw the blade of the sword like so, then add the angled tip.


STEP 4. Sketch in the detailing to the sword down the middle of the blade, then add some dimensional lines to make the sword pop.


  STEP 5. That's it, you are all done. Now you can color in your drawing and be on your way.


Wednesday, 25 February 2015

Wednesday, 18 February 2015

How to Draw Mega Blastoise tutorial.


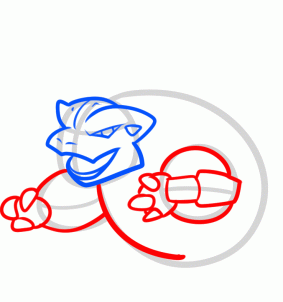
 STEP 1. Begin with some circles which will create the foundation or frame for Mega Blastoise. Start with the large torso or body shape, then draw the head and arm stubs.

STEP 2. You will now sketch out the shape of the head along with the pointed brows and then the mouth. Make sure to draw Mega Blastoise's face like you see it here.


STEP 3. Draw the chin and jawline like so, then draw in the eyes, detailing between the brows, and then add the detailing inside the ear. Don't forget to add the nostrils.

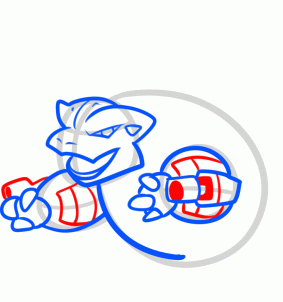
 STEP 4. Next we will draw the shape of the shell like so, then begin drawing the arms and small hands. The small gun barrels on the arms should also be drawn in as well as the three fingers.


STEP 5. Add some patches on the forearms, then color in the barrels.


 STEP 6. Now you will draw the large turtle shell on the back, and make sure the edge of the shell is thick and strong looking because it has to support the cannon like barrel.


STEP 7. Add the bracket to the gun blaster like so, and also sketch in any detailing that needs to be added.


 STEP 8. For the last drawing step add the shapes of each stubby leg, then draw in the three toed feet. You will add the vertical stripes on the belly of the shell, then erase your mistakes.


 STEP 9. Here is how Mega Blastoise looks when you are finished. Now you can go ahead and color him in.


How to Draw a Paintball Gun tutorial

How to Draw a Paintball Gun, Step by Step, Other, Weapons, FREE Online Drawing Tutorial, 
STEP 1. We will begin by drawing the paintball gun's barrel, then draw in the body and frame for your paintball gun.
STEP 2. Continue on with drawing the barrel which is an extension piece at end of the gun. When that is done you can draw the design detailing which are embossed fin like lines along the body of the paintball gun.
 STEP 3. The tube that you will draw next is where the hopper connects to the gun. Add this shape and move along to step four.

STEP 4. Up next, simply draw the front handle grip like so. This enables the user to hold the paintball gun with a solid grip. Detail the handle and then move to step five.

 STEP 5. Here we will draw the base of or rest of the paintball gun's body. This is the back grip and the trigger guard.

 STEP 6. Almost done guys. In this step all you need to do is draw the trigger, then add texture detailing to the grip.

STEP 7. Now you can draw in the CO2 hose that transfers the air to the chamber. Erase the mistakes if you made any, and that's that.

 STEP 8. Here is the line art folks. Color in your Dye paintball gun and show off your work.


Tuesday, 17 February 2015

How to draw a Baymax in Big Hero 6

How to Draw Baymax From Big Hero 6, Step by Step, Disney Characters, Cartoons, Draw Cartoon Characters, FREE Online Drawing Tutorial.


STEP 1. Make a series of shapes to form the framework for your character Baymax.


STEP 2. Starting at the torso you will draw in the shoulder armor or padding that rests on the top part of the body like so.


STEP 3.Next up, draw in the chest plate to create and form the torso.


STEP 4.We will now draw the helmet that covers Baymx's huggable head. There are ear like points as well.


STEP 5.Draw in the goggle shaped opening on the mask or helmet like so, then color in some eyes.


STEP 6.  You can now draw the arms both the biceps and forearms. The suit is super bulky.


STEP 7.Here you can draw in Baymax's hands which start rounded but then ends up with stubby fingers.


STEP 8.We will now draw in the etching on the armor starting with the shoulders. These are also seam lines and joint wires. Detail the tops of each hand like so, then move to step nine.


STEP 9.To form a more defined torso you will draw in the scale plated stomach armor. Also form the end of the stomach plate into a V.


STEP 10.changed


STEP 11.Starting at the base of the crotch, draw in the armored thighs like so leaving notched at the knee for the bottom half of the legs which will be draw in the next step.


STEP 12.Here you have it, the last aspect to finishing the formation of your Disney robot Baymax. Draw the calves and then draw the small feet.


STEP 13.Lastly add some seam lines down the hips and thighs then add joint detailing on the knee plates. Erase those guidelines you drew in step one.


STEP 14.That's it, you are all done. Now color in Baymax to bring him to life.